
By Terence Lee
Digital Pictures Tagging, Classification and Retrieval
Using deep learning, transfer learning and PyTorch to machine learn, tag and classify a dataset of tens of thousands of family vacation photos to facilitate easy search and retrieval based on set parameter(s) such as scenery, building, flowers, sculpture, animal, nighttime, garden, person, church etc.

Prediction using multi-tagging dataset built on a CNN using Pytorch and deep learning
The Idea
I started this project when my family was scrolling through tens of thousands of photos to collect specific scenery photos to design and make a coffee table book.
My goal was to train a neural net so that the entire library of family pictures could be identified, tagged and categorized. Once machine-tagged, all the relevant photos could be indexed and rendered.
Build a CNN using Deep Learning/PyTorch
After further research, I decided on implementing a convolutional neural network (CNN) utilizing an industry standard deep learning library, PyTorch, which would feed predictions into a database that would be indexed and easily searchable via the elastic stack.
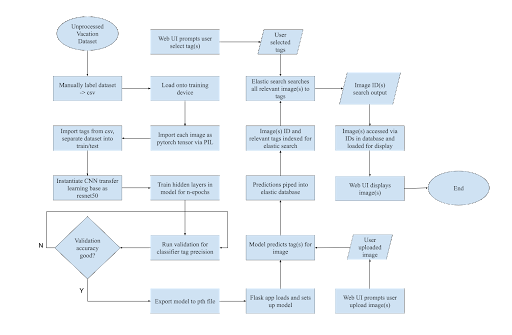
MultiTag Photo Classifier Flowchart
Environment Setup
My initial setup was to build this project using tools such as Jupiter notebook for its ease of use and google Collab for its cloud processing and training capabilities. However, I ran into numerous kernel and module related issues when trying to run my code.
After assigning a virtual environment in conda, installing the necessary dependencies, and assigning the Jupiter notebook kernel to the appropriate env, there seemed to be a dependency issue when running the training for the PyTorch model.
It appeared that there was a bug with the Jupiter notebook. In the middle of the code block running the process crashed and returned a traceback call
Error msg here:BrokenPipeError: [Errno 32] Broken pipe
AttributeError: Can't get attribute 'NusDataset' on <module '__main__' (built-in)>
After various attempts to debug the environment, and in the interest of saving time, I opted to simply migrate the code back into a native python environment and file hierarchy.
I had originally set up the training model on a Nvidia Jetson Nano portable computer. The Jetson Nano Developer Kit was easy to configure and would have made the training and execution of the model much easier. Due to the arm processor used in the Jetson Nano, I ran into compatibility issues with my environment. For better performance, I decided to train the classification deep learning model using my Nvidia GTX Graphics Card to significantly reduce training time and eliminate any compatibility issues.
Class structure:
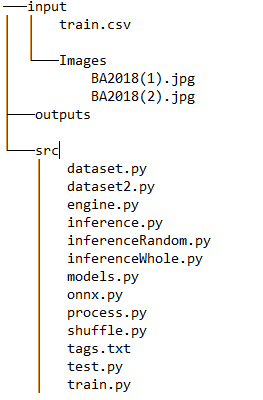
Three folders are set up:
The “input” folder houses all our raw data which are vacation photos. Inside, we have a train.csv file that has all the photo image names classified based on its respective attributes.
The “output” folder contains our trained data from deep learning models along with their graphical loss plots from each iteration.
Finally, we have the “src” folder that contains thirteen Python scripts. We will cover each of these items through the rest of this article.
Dataset preparation
The original approach was to train a CNN from scratch using the entire picture library, but decided that implementing transfer learning on an existing model (in this case ResNet50) would be more time efficient for purposes of general classification. For the training/testing dataset, I selected and manually tagged a selection of 1,500 vacation images into 29 unique tags and stored said information into a csv file.
Train/Validate/Test
As a starting point, I adopted a generic code skeleton that was built for classifying the genres of movie posters through transfer learning. But various code modifications were made to tailor to the photo multi-tag project including:
alter the model dimensions so that my custom dataset could fit the final ResNet layer
add additional transforms such as image normalization
add code which converts the output model file into an onxx file
The code utilized PyTorch for training/tagging, OpenCV for image preprocessing, and Matplotlib for generating loss plots.The dataset was split into a ratio of 85-15 for training and testing respectively as generally higher training ratios yield more accurate models.
Optimal number of epochs to train a neural network
The number of epochs to train a neural dataset will impact the accuracy of the training dataset. Too many epochs may adversely impact the training model to overfit the training data. What this means is that the model merely memorizes the data instead of learning it. With each iteration, as the number of epochs (weight changes) increase in the neural network, the accuracy of the data will go from “underfitting” to “optimal” to “overfitting”.

Data Training Chart - Loss vs Epochs
Through trial and error, I concluded that ~25 epochs was the optimal point where training and validation loss were minimized. In the above graph, both training and validation loss decrease as epochs increase. Though not pictured, once the model passes 20 epochs, both loss plots stagnate however the classification accuracy of the resulting model spikes significantly.
My research into the PyTorch library yielded that the activation function used, “BCELoss passed through a sigmoid function”, was less stable than an alternative but equivalent “BCEWithLogitsLoss function” which I decided to utilize.
While training, I ran into an issue where the process would error out at random intervals due to a CUDA device-side assert. Through further research and debugging, I discovered the cause to be nan image tensors being fed into the model which results in a BCE activation function error; more specifically, a bug in the preprocessing stage of the code led to incorrect image file names leading to OpenCV opening invalid or non-existant files which resulted in the nan tensors.
Modifying class structure to finetune and randomize test results
During the classification stage, there were several severely underrepresented tags in the data leading to classification issues.To fix this bias, I added more diverse pictures to ensure that all tags in the family vacation photo library are well represented.
The base code was designed so that the last 10 cells of the csv file were always utilized for classification once the model was trained. This implementation had very rigid use cases so I modified the class structure and altered the base inference.py script.
The new dataset class (dataset2.py) marks an entire csv for classification rather than just the last x images which is helpful for classifying large volumes of images for the elastic database. Alternatively, for better testing and visualization purposes, the shuffle.py script randomizes all the image cells so that the images classified aren’t always the same x images. The model was then saved and exported into a pth file so I could move onto the web-app section.
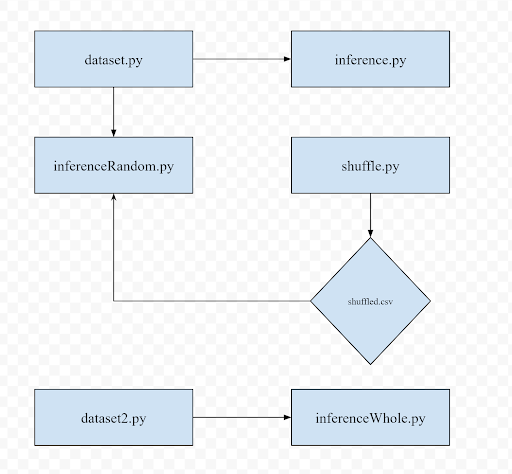
Modified class structure to randomize and finetune dataset
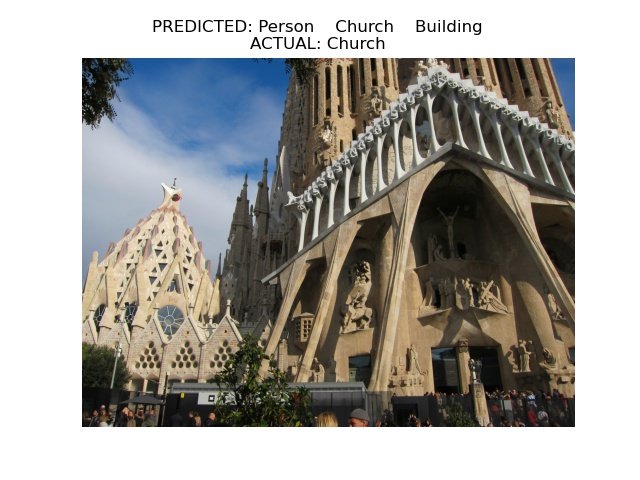
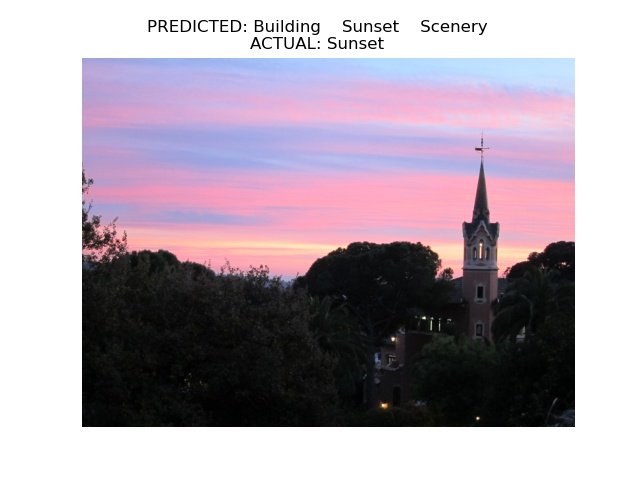
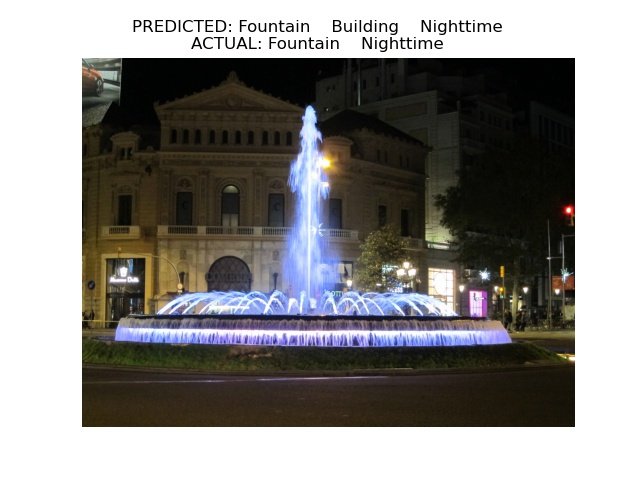
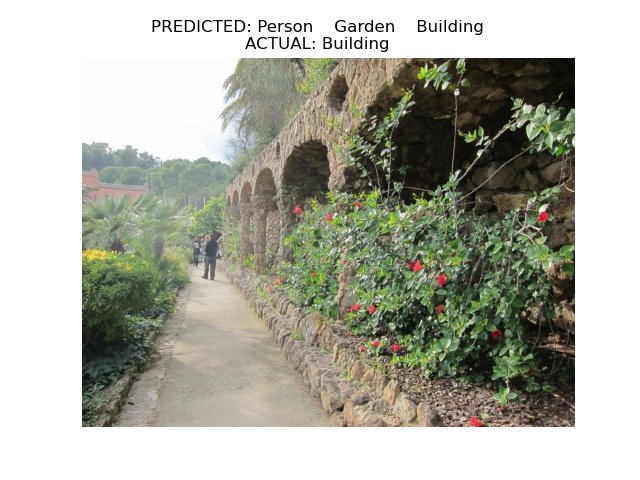
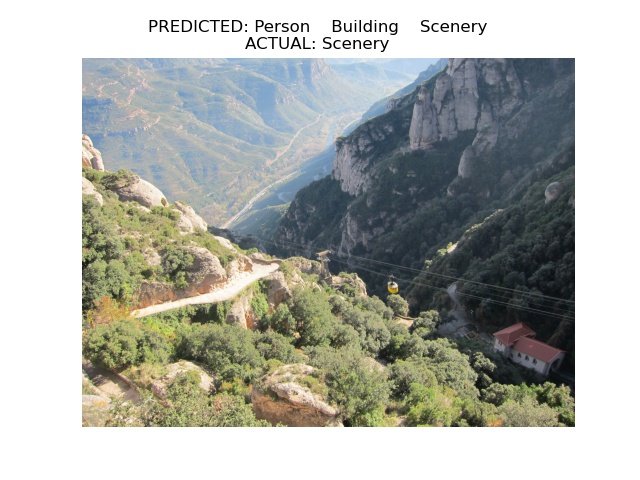
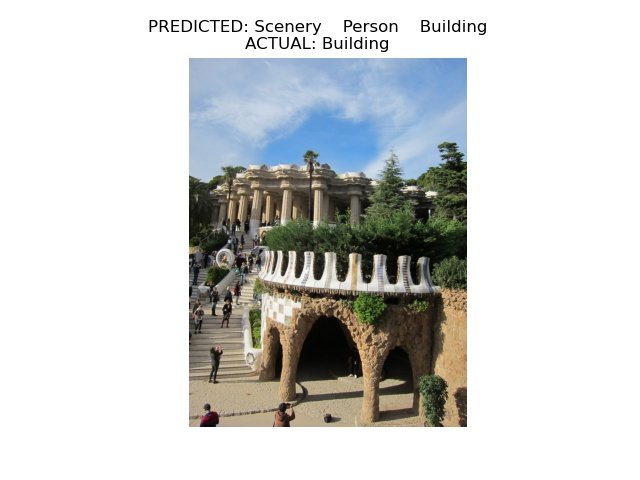
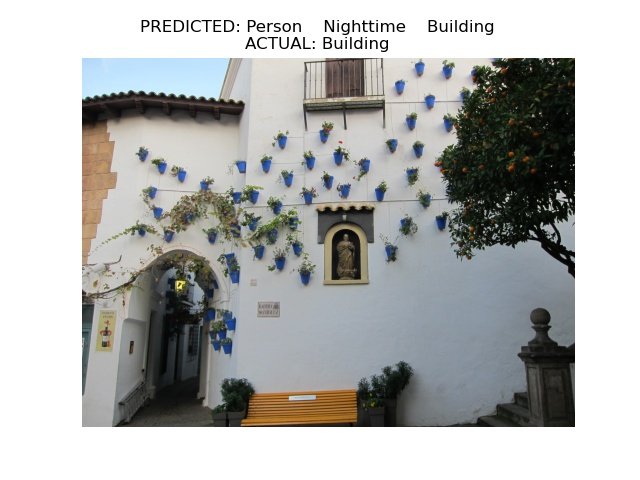
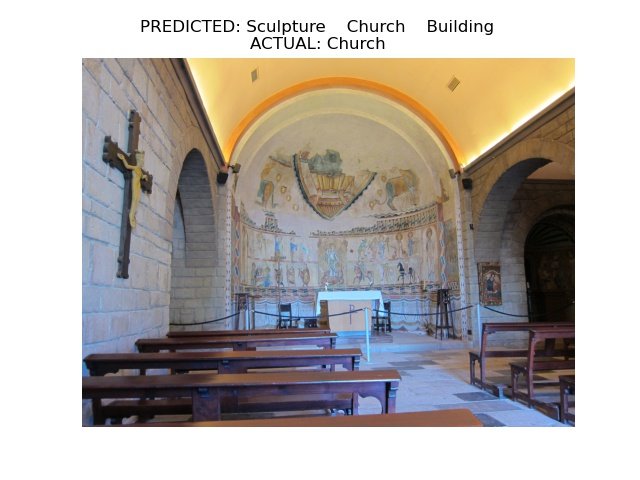
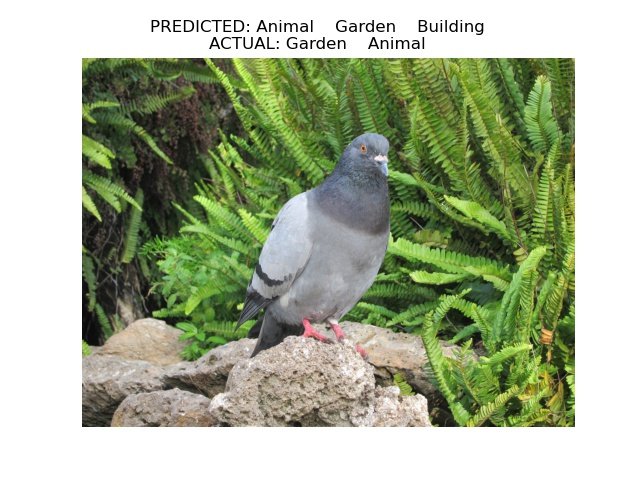
The Result - Predicted versus Actual
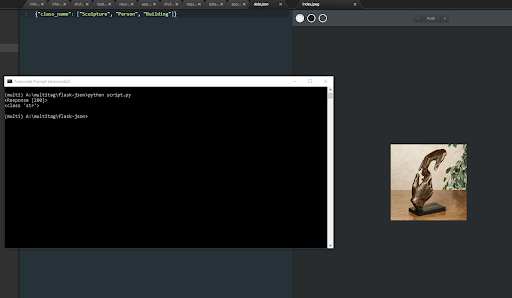
Predictions were made based on set parameter(s) such as scenery, building, flowers, sculpture, animal, nighttime, garden, fountain, church etc. as defined in the properly trained deep learning model. Actual tags assignment can be found here.


Deploying Deep Learning Multi Tag Model via Flask on Heroku
My research first led me to consider options such as ONNX and TensorRT as they seemed to be both versatile and powerful tools. Unfortunately, I ran into issues at each step of the process with incompatibility and configuration issues. As such, I pivoted into merely taking the pth file and building a web app based on importing the model file directly into the cpu version of PyTorch (which is inherently much less resource intensive.)
Pivoting to Flask
Several articles pointed me to Flask, a commonly used tool for directly interfacing with PyTorch and translating model outputs into a clean and intuitive UI. After studying the Flask documentation, I implemented a basic flask app that was intended to test its capabilities.
The app simply returned a json file containing the model’s predictions when prompted with a http request with the input image. Since the app was functional, I continued looking into flask as a web app and discovered two different UI approaches.
The first involved prompting a user to upload an image upon which the app outputs the image uploaded as well as the predicted tags; simple enough. A live demo of my implementation can be found here.
The second involved the user inputting a website link that contained images which the app would scrape and classify outputting the predicted tags and a tabulated list of the most frequent tags that came up. Since both options provided a different useful functionality, I analyzed both skeleton codes and restructured them to fit my model and hosted them on heroku so they could be demoed for anyone interested in the project.
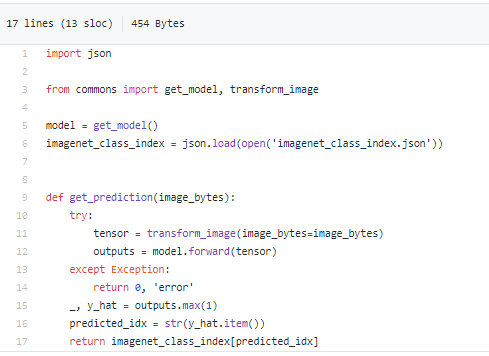
The upload web app code relied on a pre-trained imageNet model for classifying the uploaded image; since I was trying to run classifications on my transfer learning model, I had to rewrite the get_prediction function called in app.py completely.
This involved importing the transform_image function from the model training code, loading the PyTorch pth model into memory, and condensing the inferences.py file into a new get_prediction function that properly takes the input image and classifies it utilizing the vacation dataset classifier I trained.
Before rewrite:
After rewrite:
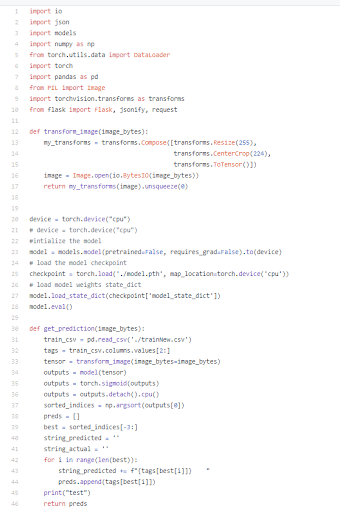
Image Scraper Code
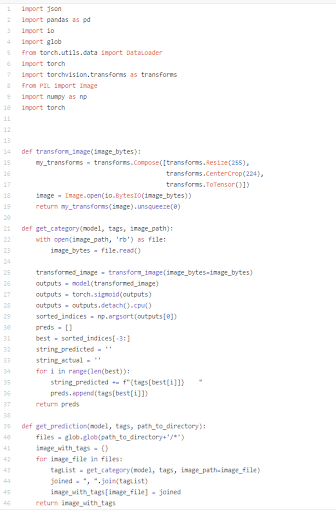
For the image scraper code, the changes I made were fairly similar. It utilized a pre-trained DenseNet121 model for classification which I had to replace with my own model. This involved rewriting the get_prediction function as well as changing the arguments to remove any dependency on the pretrained model. Like with the other code skeleton, I ported the image transformation and classification functionality from the model training code into the three existing functions (transform_image, get_category, get_prediction). I also adjusted the function output so that the top x predicted tags would be output rather than just one tag.
Image scraper code before:
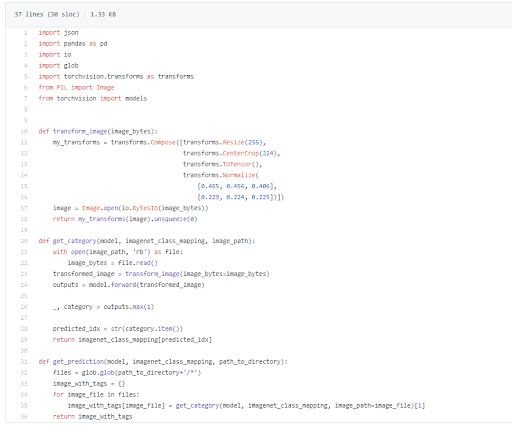
Image scraper code After:
Elastic Stack:
Next step is to import the entire multi-tag database of vacation photos into an elastic database. I currently have a script that has classified all the images and stored the results into a json file. This json file is then formatted properly for the elastic search database before being uploaded using an appropriate API key.
At the same time, I am working to continue to improve the model accuracy. My plans are to eventually use this database in a web app where users can search for pictures via specific single or multiple tag(s) and the app will pull and display all matching results.
Works Cited:
https://debuggercafe.com/multi-label-image-classification-with-pytorch-and-deep-learning/
https://learnopencv.com/image-classification-using-transfer-learning-in-pytorch/
https://stackoverflow.com/questions/45685719/textjoin-only-when-the-condition-is-met
https://pytorch.org/tutorials/recipes/deployment_with_flask.html
https://pytorch.org/tutorials/intermediate/flask_rest_api_tutorial.html